Obviously, not all of her winter clothes, just the ones that Mom made.
Made from one of my old sweaters that was too short. It's looking a bit short on Miss K, too! I just recut the sleeves and shoulders and took in the sides. Super easy and very cute.
I love this little shirt. So simple and girly. Next time I make this pattern, I'll try pleating the little collar insert instead of ruffling it. I learned a new technique of make a separate lining to attach to the hem of the shirt and sleeves to create a flared look.
Whenever Miss K would come into my sewing room, she would immediately pull out this fabric and snuggle up with it. I knew I needed to make something with it before she outgrew the yardage I had. I used her jammie shirt pattern and just extended the length to create a dress. I really like how it turned out and Miss K loves it.
This might be my favorite item of clothing I sewed for Miss K this winter. It is a shirt/dress/tunic thing - I'm not sure which. It is extra long with a cute little hood and made from flannel. I saw this pattern on another site and loved it, but not the $15 price tag. My friend, Carrie, and I came up with the pattern on our own. Super cute!
Miss K loves to twirl, so when Dana from MADE did a circle skirt with thick elastic waistband tutorial, I knew I had to make one. I choose a very light weight dark chambray for the fabric. It was so incredibly easy. I see a lot of these cute little skirts in Miss K's summer wardrobe.
Monday, December 13, 2010
Tuesday, October 12, 2010
Cherries for the Twins
A lovely family in my neighborhood recently welcomed twin girls. Unfortunately they had a lengthy stay in the NICU before they were able to come home. The neighborhood threw a baby shower for them (not really. We dropped off gifts at a friends home who then took them over to the twins so we wouldn't spread too many germs).
I wasn't sure how their mom felt about dressing them alike, so I didn't make matching dresses. However, the dresses do coordinate. I think they turned out very cute. I used the Itty Bitty Dress pattern from Made by Rae.
Wednesday, September 29, 2010
Tuesday, July 13, 2010
Super Baby
My sister, Valerie, and I threw a baby shower for our other sister, Michelle. We went with a Superman theme because Michelle's husband really likes Superman. I won't bore you with all the details from the party, but I did want to show off the cute outfit I made for baby Marcus. It turned out really cute (although the hat did give me a lot of problems). They are decorating the baby's room in a puppy theme, so we found a cute stuffed dog to model the outfit.
Tuesday, June 29, 2010
Itty Bitty Dress
I've been eyeing this dress pattern for quite some time. It looked so cute and easy and, best of all, free. I finally had an excuse to sew a tiny girl dress for a friend of my mine who is having a baby girl in a few weeks. I dug through my pink fabric, came up with some fun polka dots and strips and was finished with the dress in about 1 1/2 hours. So easy, so cute and so fun.
I made the dress reversible. I love doing this for two reasons - two dress in one and all your seams are enclosed, no annoying thread hanging down past your hem. I made the stripped skirt section longer than the dots and then folded it up and over to create the border along the bottom of the dress. I added some ric rac at the waist seam and also on the border seam.
She also has a toddler version and I can't wait to try it out for Miss K. Although from the pictures on her Flikr group, I'd make the straps shorter for the toddler dress. They look a bit too floppy for my taste, not cute little ties like in the baby dress.
Try this out, it is so easy and cute!
Saturday, June 26, 2010
Swimsuit Cover-Up
We really don't spend a lot of time at the pool and since we are landlocked, not at the beach either. But, we were taking a family trip to Arizona and I knew we were be in the pool a lot. I stumbled upon some soft pink terry cloth fabric at Wal-mart for $1/yard and knew it would make a great cover-up for Miss K.
Of course, I stayed up late the night before trying to finish it. Stupid! However, it was easy. I wish my computer skills were better and I'd draw a picture to show you how I did it. Needless to say, it was easy. And Miss K loves it.
PS - I know it's silly to have Miss K cover her face in all these pictures, but I'm freaked out about the internet!
Monday, June 7, 2010
White Ruffley Skirt
I bought a cute blue and white polka-dotted shirt for Miss K last fall on clearance. She didn't have any bottoms that matched it, so I made up a white skirt on Saturday. Unfortunately, when I put the top and skirt together, they didn't look so great. But, I still love the skirt.
I made the top section with the elastic casing and then cut two rectangles for the bottom, one rectangle being longer than the other. I sewed cotton lace to the bottoms of both rectangles and then took the longer rectangle and sewed in elastic thread every six inches to create the ruffles. Then took both rectangles basted them together, gathered and sewed them to the top section. Pretty easy.
I really like how it turned out. I'm probably all kinds of stupid making a white skirt for a two year old. And even though it doesn't match the shirt I made it for, it looks really cute with a dressy t-shirt
Saturday, June 5, 2010
Pink Shirt
I've decided that sewing shirts may not be worth it. They are just a bother, not nearly as much fun as skirts or dresses. Maybe I'm just not good at it. Who knows?
This is my latest attempt at sewing a shirt for Miss K. I altered a McCall's patterns and used elastic thread instead of putting in casings and then elastic. It was very full around the bottom and too short. Miss K is quite petite and she has a hard time keeping her pants up, so her shirts have to be long enough to hide the slouching pants and showing diaper. I added the bottom ruffley part with more elastic thread to help solve this problem. I think it turned out okay. I also think it's easier to buy a shirt at Target. Oh well.
Wednesday, June 2, 2010
Summer Skirt
A few weeks ago our family was at my parents-in-law home for our weekly Sunday visit. My 8-year-old niece was over with her family as well. She was wearing the most adorable skirt. I gushed over it so much that my sweet sister-in-law gave me the leftover fabric from her daughter's skirt. Hence, Miss K has a new summer skirt.
It was so easy to make, but I love how it turned out. The blog, Craftershours, is having a skirt contest and I'm thinking about entering this skirt. What do you think? There is nothing special about the pattern, but I think it came together so well. I also made little fabric flowers to put in Miss K's hair.
Saturday, May 22, 2010
Crazy Jammies
It's getting warm. Miss K needed some summer jammies. I have been looking for some inexpensive knit for quite awhile. It is hard to find! I finally spotted some at Wal-mart. It was a crazy 70's pattern, happy with yellow and orange dots. I'm not sure I'd make a dress out of it, but for jammies, it was great.
Miss K loves any new clothes so she was happy with her new jammies. Not having sewn with knit a lot, it was a bit tricky. Plus, I'm sure my $2/yard fabric wasn't the best quality. They went together quickly and hopefully they will last the summer season.
Tuesday, May 4, 2010
BYU Quilt
Mr G loves heavy, fuzzy quilts. His favorite quilt is one I made years ago. It is denim on the front and flannel on the back and it is huge, at least a king size. He loves to sleep with it and it is an absolute pain to wash. For his birthday, I decided to make him a new, smaller quilt. Mr G loves BYU, so perfect - a BYU demin quilt.
I borrowed a handy little projector (I'm going to have to get one of those!). I traced the BYU logo onto the quilt, cut it out and then appliqued it on. So easy and quick! The demin back took a bit longer. I cut up old family jeans into squares and sewed them back together. I love recycling fabric! Mr G loved his quilt. Now I just have to quilt and bind it (didn't quite get that done before his birthday!).
Miss K's purple dress
Miss K has been asking for months for a purple dress. I've had a hard time finding cute purple fabric so I've put it off. I finally dug some fabric out of my humanitarian box (you know, fabric you're not sure you love, but still keep around for service projects). Once the fabric was sewn into a dress, I decided I liked it! I used a bunch of elastic thread and it went together so quickly. I basically cut a rectangle, sewed in my elastic thread, added straps and a ruffle and that was it. Miss K loves it!
Sunday, April 4, 2010
Easter
I love Easter. Although it seems a bit like Christmas. I'm so busy making things, planning food, wanting everything to be perfect that it comes and goes without me really thinking about why we have these holidays, let alone teaching my kids why we have these holidays. Okay, that was a long ramble, off the subject. But, it's really bothering me. How do you balance the fun with the true meaning as a mom? Let me know.
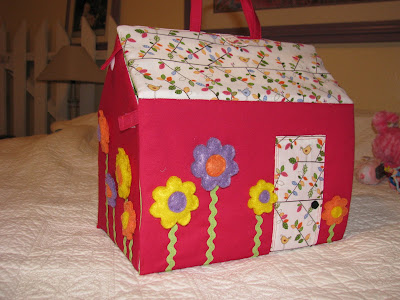
This year, Miss K and Mr E got a few homemade things in their Easter baskets. Mr G did not. I just don't know what to sew for an almost 12-year-old boy beside jammies and costumes. Back to Easter. I really wanted to try these cute dollhouses. I convinced myself I could do it and just starting cutting fabric. After much unpicking, fudging seams and wondering why I was doing this - I finished them both. Wow! They were a bit of work, but the kids will love them. A note: be careful. I didn't realize until I was done with Mr E's that I put the 'grass' fabric on the ceiling. At that point it would have taken major remodeling work it fix it, so I didn't. Also, I cut my fabric twice as big as the dimensions given in the tutorial.
I also made a cute little dress for Miss K. When I found this fabric in the remnant bin at JoAnns, I grabbed it. I love the color, the embroidery and the texture. When I showed Miss K the fabric and told her I was making her an Easter dress from it, she said, "No mama, peeple (purple)". I guess she needs a purple (her favorite color) dress.
I also made some ties for Mr E. I'm in love with making ties. They are so easy and quick. Mostly, you can pick out way cute fabric instead of boring navy and red stripped ties. Another added bonus: Mr E cannot take these off himself as opposed to clip on ties which always get left at church. This was made with the Simplicity pattern. A note: I had to increase the boys tie by about six inches to give it enough length.
PS - My photography skills will improve someday!
Monday, March 29, 2010
Pink Knit Dress
When I picked up this fabric at Wal-mart for $1.50 a yard, I wasn't sure what I was going to do with it - I just knew I liked the color and feel (so soft). Miss K looks so cute in this color; of course, it had to be hers. It is very thin and flimsy so I knew I had to layer it. I ended up doubling up the fabric. I also plan on having Miss K wearing it over a peasant slip. I loosely followed this dress pattern. I think it turned out very cute! Miss K spent at least 15 minutes twirling in it!
Thursday, March 25, 2010
Stripe Skirt
I put this skirt together for Miss K this afternoon. I used fabric from my statch and matched it to a shirt Miss K already had. I'm not sure if I like it or not. It looks a bit like a too-long tube. I'm deciding if I should just leave it and use it for a play skirt (which was it's main purpose) or try to 'fix' it. Any ideas?
Sunday, March 7, 2010
Conference Candy Bags
I love the blog, MADE. It is fantastic; check it out if you haven't ever been there before.
When I saw these cute bags on her blog, I immediately put them on my projects list. After looking at them a second time, I knew exactly what I wanted to do with them.
Last General Conference, I put together some bags to keep the kids entertained (after all, 8 hours of church is a lot!).
I thought I would add something fun each Conference to keep things exciting. One of my kids favorite parts of Conference is unlimited M&M's. Perfect! A cute little bag to hold their chocolate.
I've never made bags with the zipper like this. They are so easy and go together very quickly. This was also my first time working with plastic; a little tricky on the sewing machine, but it came together in the end. I think they turned out very cute and handy for my first go-around.
Friday, February 26, 2010
Miss K's Jammie Quilt
I'll admit, I'm cheap.
I made winter jammies for Miss K and Mr E this past fall. Having just started making clothes, I was shocked at how much fabric was left over after cutting out the patterns. I'm used to quilting where there is not so much waste. I threw all the scraps into a bag and put them in the corner of my sewing room hoping to find something to do with them.
Of course, what was I thinking? - A quilt!
Since most of the pieces where odd shaped, I decided on a crazy quilt. I cut the large pieces into 6 1/2 inch squares and then sewed the rest together in crazy squares.
I alternated the solid squares with the crazy squares. The quilt is 6 squares across and 8 squares down; not a big quilt, but big enough for a little girl to wrap up in while watching TV or have a picnic on in the backyard. It took a bit of time, but it was so satisfying to use up the fabric and throw only a minimal amount away.
I can't get the picture to turn and I really don't have time right now to mess with it. Miss K is playing peek-a-boo with you!
The quilt is not finished yet, but I wanted to get a picture with Miss K before she outgrew her jammies that match the quilt. She is so in love with this quilt. She keeps saying, "mine jammie blankie". I have squares done for Mr E's quilt; I'll post pictures when it is put together.
Wednesday, February 24, 2010
Happy Brithday
Since our family has two birthdays in February, I tend to go into birthday mode in late January. I've always wanted to do some kind of birthday banner and this is the year it finally got DONE.
I tried to find some gender neutral fabrics since I didn't want to make a boy and a girl one. I think it turned out fun. The kids got a kick out of it.
They really loved the birthday crown. The birthday child gets to sit in the birthday chair, wear the crown and open their presents. Wow! It's their special day. (The crown has Velcro on the back so we can adjust it to many head sizes.)
I made fabric bags a few years ago for Christmas presents and I love, love, love them. Not only does it save money and trees by avoiding wrapping paper, but I can wrap all my Christmas in 30 minutes - yes, 30 minutes. They are wonderful. My kids know to stuff the ribbon to the bottom of the bag so it is there when I wrap next year. It makes it so easy. I also made tags with my kids names on them. I know, a bit over-the-top, but I'm all about doing it well once and then having it easy after that.
Since I was wrapping a large wheelbarrow and a trike this year, I decided to do bags (good grief, how would you wrap a wheelbarrow and trike?) I found solid-colored fabric that matched the banner and the rest was easy. Obviously this is a smaller bag (I made a few different sizes. The wheelbarrow/trike bag was about 4 yards of fabric).
I probably won't do a lot of tutorials because 1. If I can do it, it's easy enough for others to figure out and 2. I'm really good at copying other's brilliance (I'll give credit where it is due).
Thanks for visiting!
Subscribe to:
Posts (Atom)